Here you will learn how to create your own targets for augmented reality applications through the software provided by Vuforia in 10 simple steps. Our application "WUIM-AR" will direct you to the creation of your own application.
Unfortunately, since Vuforia has to process the images you want to choose for targets, the following proccess can't be automated by us.
This page may initially seem long and complicated, but you don't have to worry, most of it is images that show you the proccess. No specific programming knowledge is required.
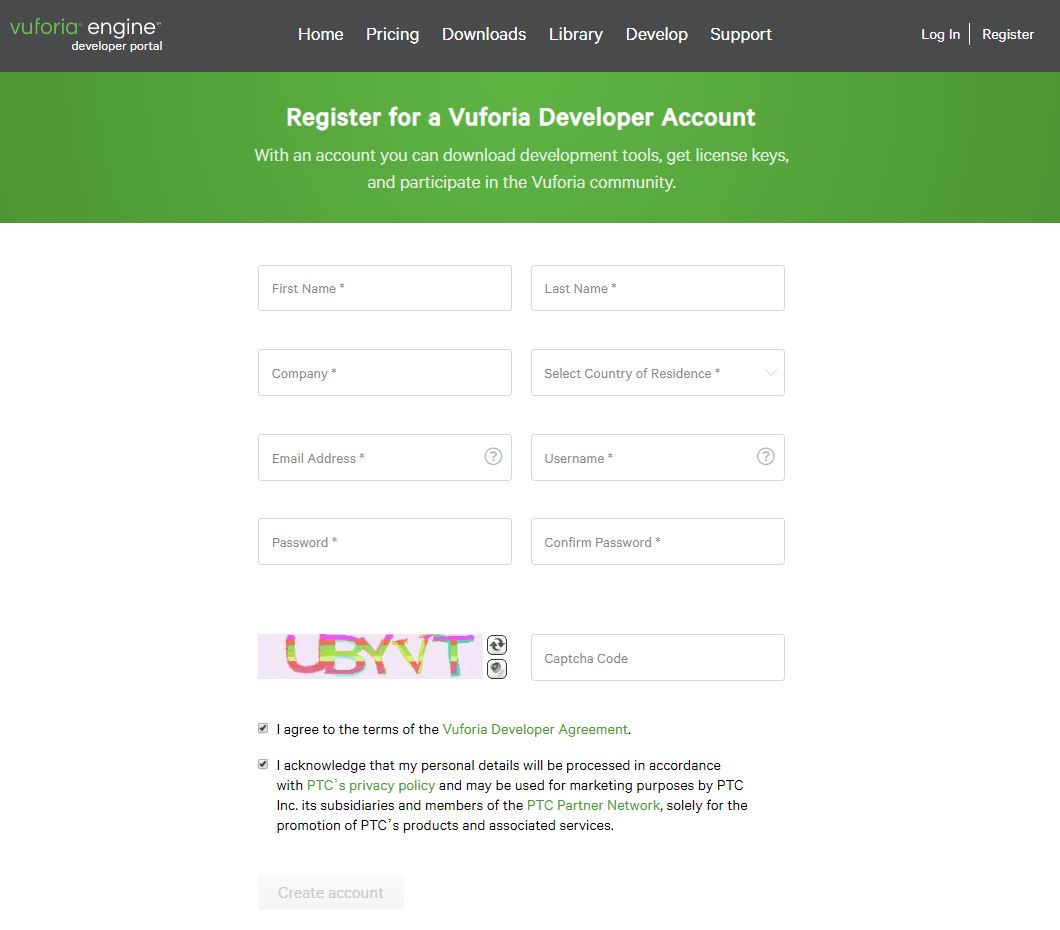
First you need to go to Vuforia developer website and click Register (top right).
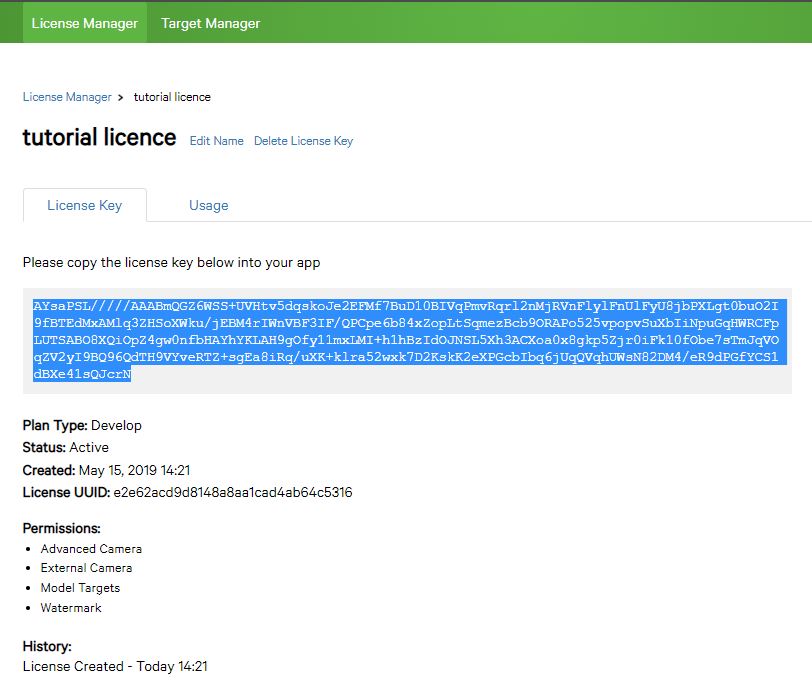
After you sign up, choose the "Develop" tab (at the top) and then the "License Manager" tab. Find and click the "Get Development Key". Make up a name for your app, check the license box, and then choose Create.

Then go back to the Licence Manager and click on the licence you created. There you will see a large string of random characters. Select them, right-click and copy (or ctrl + c). Keep this licence key coppied because you'll need it later.
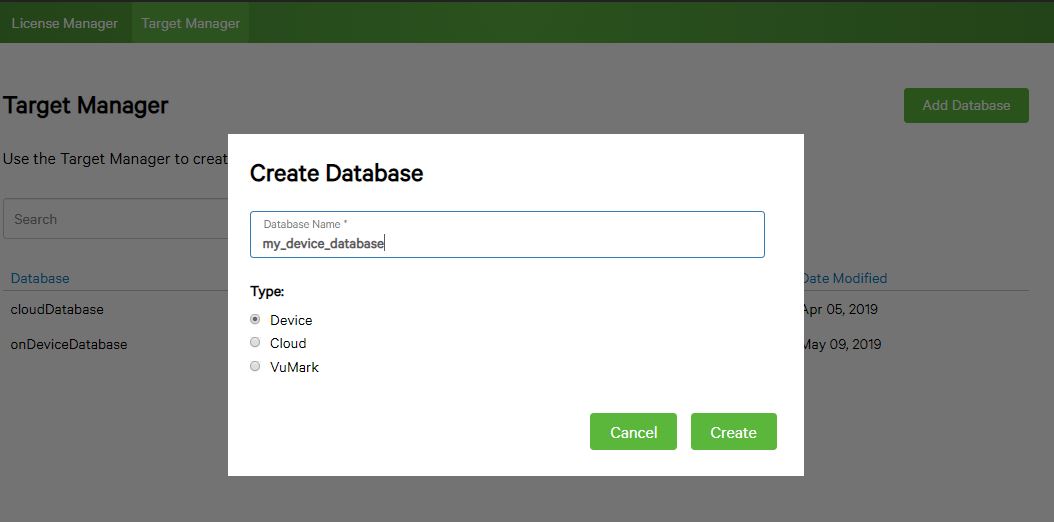
After you've created an account and license key, it's time to create a database. Don't worry, it's simple. Press the "Target manager" next to "License Manager" and then "Add Database" (on the right). Select Device and provide a name for the database you are creating.
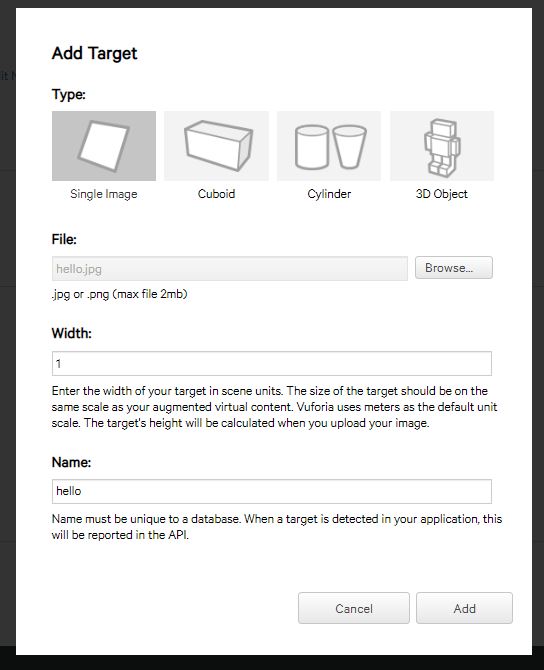
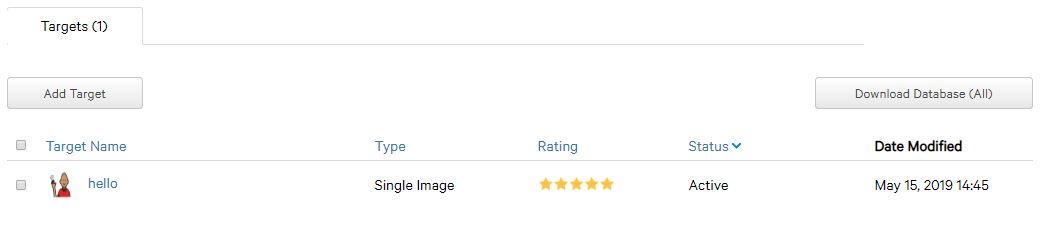
Now that you've created the database, you're ready to add some images (targets). Select the database you just created and click "Add Target".
Select "Single Image" and click "Browse" to find the picture you want to use from your computer. After selecting the image, make sure its name is unique and easily identifiable. As for "Width", just insert "1".
After uploading the image that will then be used as a target, Vuforia will take some time to process it. After a few seconds refresh the page to see your target.
For each image / target you upload, a rating score (stars) and a status (e.g., active) are created. The ideal would be for all your targets to have a rating of five stars, but even a score of 3 or 4 stars is enough to be recognized from the app.
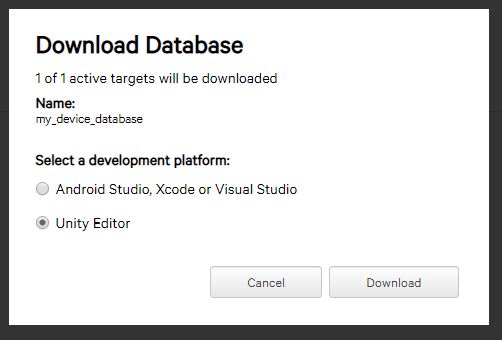
Once you've uploaded all the targets you want and made sure that their status is active and with a satisfactory rating score, it's time to download the database to your computer.
Find the "Download Database(All)" button and click it. Then choose "Unity Editor" and click "Download".
Now that you have completed your work with Vuforia, you are ready to download Unity. Go to the Unity website and download if (for free) from the "Individual" tab. Click on "Get started" at the "Personal" area.
After you’ve installed Unity on your computer, you can download our application files by clicking here. When the download is complete, unzip the file and open Unity. Inside Unity, click the "Open" button on the top right and choose to open the folder of the project you unzipped.
Now that you're inside the app, you may find the amount of data excessive, but fortunately, you don't have to deal with most of it. The first thing you need to do is locate the project window, then find the folder named Resources and open it.
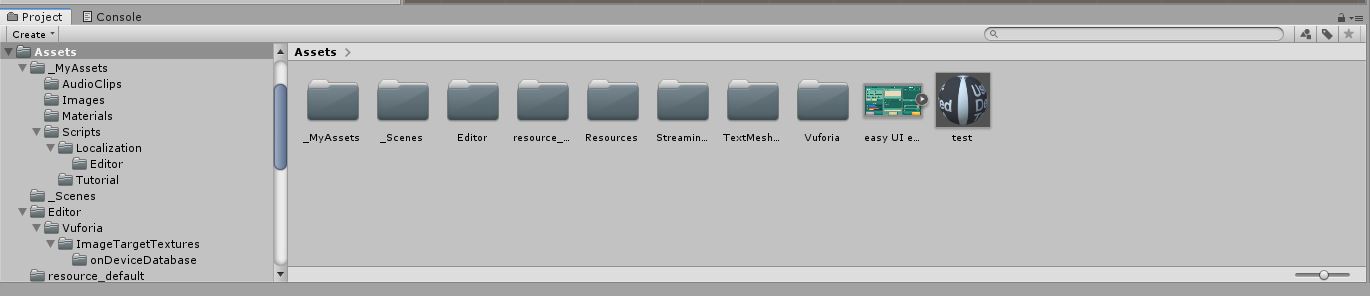
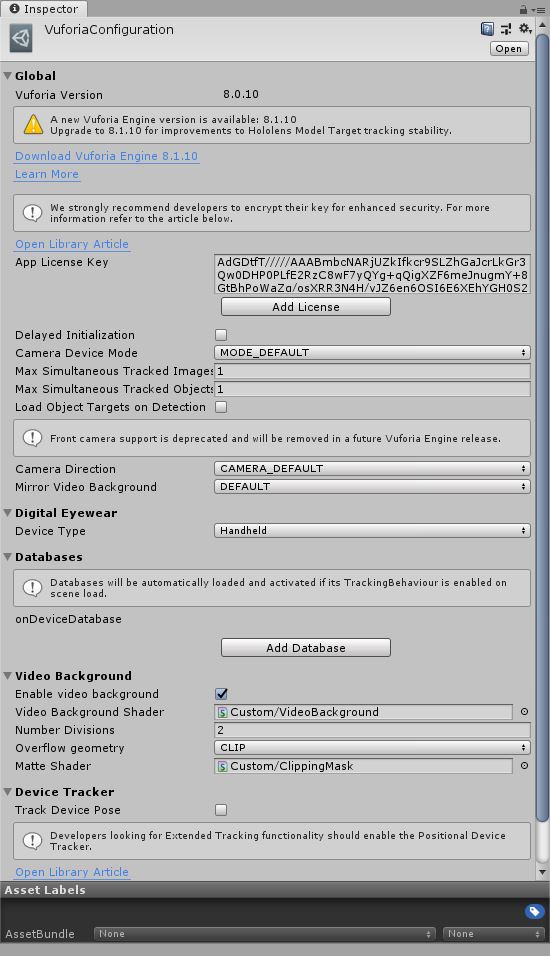
Inside you will find a single file named VuforiaConfiguration; select it with left click. Next, find in the inspector window on the right the "App License Key" text box. Remember that big string you coppied from the Vuforia site? You need to paste it here.
The next step is to import the database you created. Find the file you downloaded from Vuforia (probably located in the Downloads folder) and double click it. A window will pop up inside Unity, just press Import.
After you're done with this, you're ready to import the content you want to view. Go back to "Assets" folder and then to "StreamingAssets" folder. Make sure that all videos have a unique and recognizable name.
If you want to add sounds to the game, go back again to "Assets, then "_MyAssets" and then "AudioClips". Here you can drop your sounds.
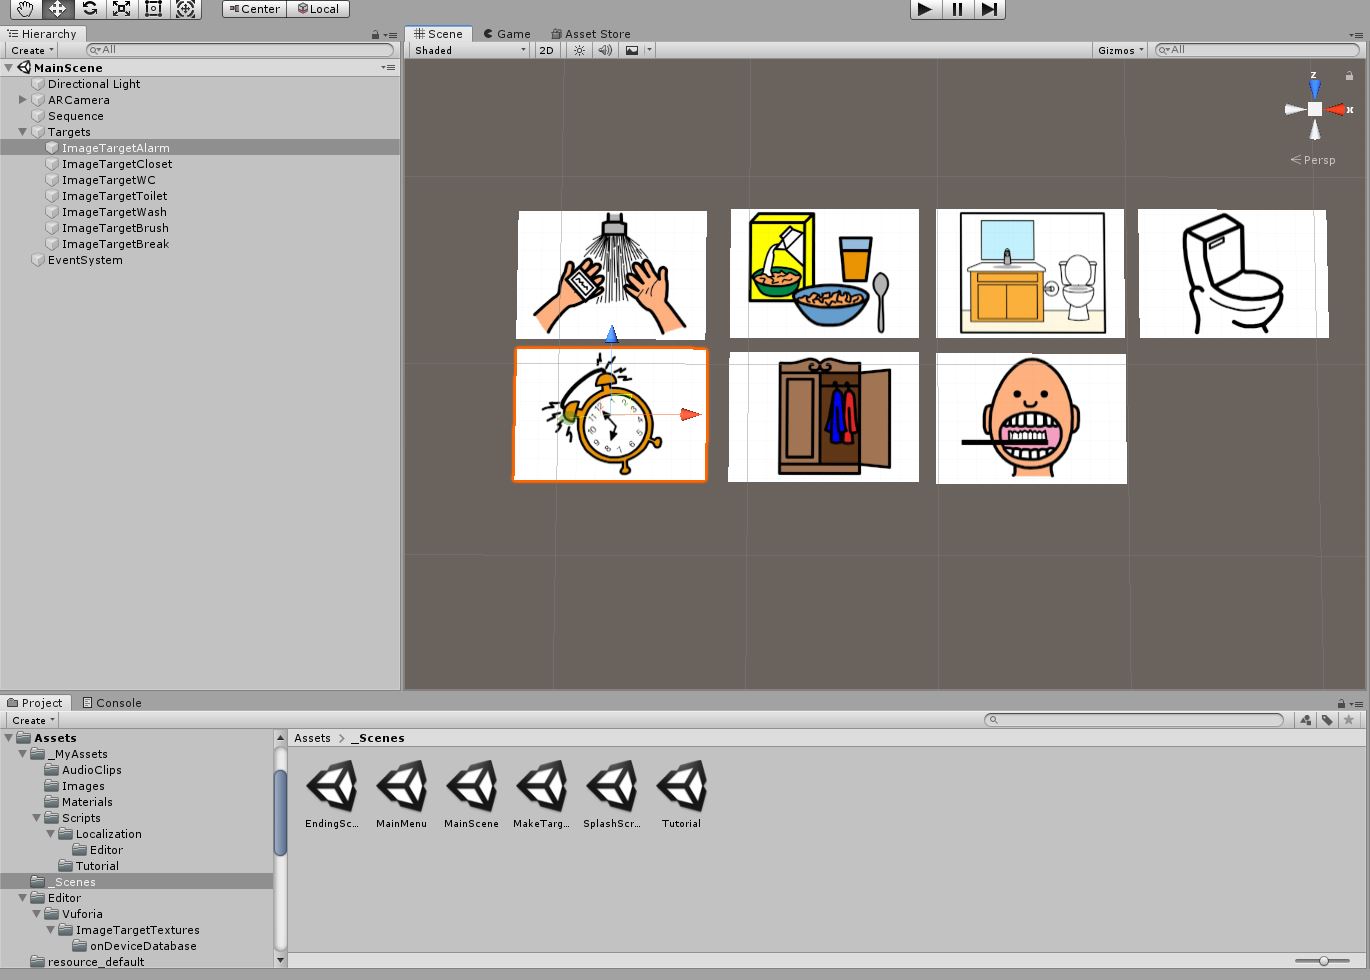
You'll then need to combine targets, videos, and sounds. First, go to "Assets", then "_Scenes" and double-click "MainScene". Inside MainScene, you may not see any images. In this case, make sure the "2D" button is unchecked, then left-click on the arrow next to Targets to open the list. Finally, double-click on any of the targets you want.
You can navigate in the scene view with the right mouse button, the mouse wheel and the middle mouse button.
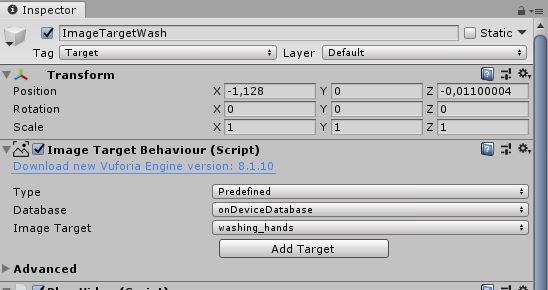
First of all, change the name of the target to something that better suits your image. You can do that by right clicking on the desired target and selecting "Rename".
Then, to change the image of the target, select one of the targets. On the right of the screen, find the "Image Target Behaviour (Script)", click on the Database dropdown and choose your database. Make sure that the Type dropdown above is set to Predefined. Now you can click on the dropdown next to Image Target to pick a target image from your database.
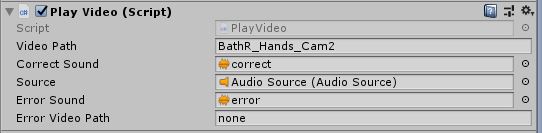
Next, add your corresponding videos and sounds. This is very simple, just find the name of the video or sound you want to include from the StreamingAssets and type it on the correct text entry in the "Play Video (Script)" section under "Image Target Behaviour (Script)".
At this point, you are going to do some coding. Don't worry! You will make some, simple changes to an existing program written by the developer of the WUIM-AR application (you don't even need to understand what you write). To get started, go to the "Assets", then "_MyAssets", "Scripts" and double click on "GetAllImageTargets". If you downloaded Visual Studio along with Unity it will open up and you will be able to see the code. Otherwise, it is possible to make these changes in a simple text editor.
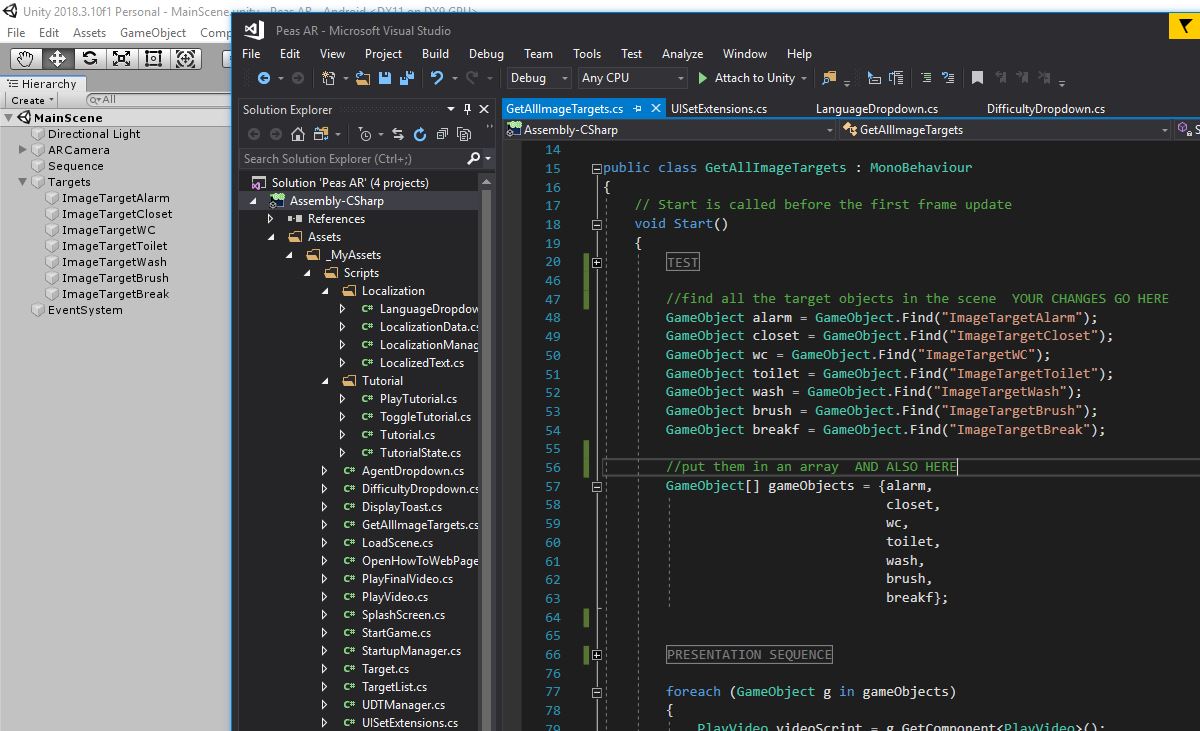
The first thing you will need to do is change all the names that come after the word GameObject and before the '=' sign to names that better describe your target images. Then you need to change all the names between quotation marks (" ") to their corresponding names that you gave in the "MainScene" "Targets list". Make sure that the names are exactly the same (meaning they have the same capitalization).
The last thing you need to do is put all the names you gave (e.g. alarm) between the curly brackets { } that come after "gameobjects = ". This is your sequence of correct actions, i.e. the actions needed to be taken in that order to finish the game.
To download the app to your device, you need to turn on the developer settings (there is a case, the procedure differs in each device). Open your device's Settings, then System, About Phone and find "Build Number". Then tap on Build Number a few times (usually 7) until you see a popup that says you are now a developer. Go Back once to System and find the new section called "Developer options". Make sure it is on, find the Debugging section and enable USB Debugging.
Congratulations, if you made it this far you will be glad to know that you are almost done; all that is left is to export the app to your Android device. In the Build Settings window inside Unity click "Build And Run". You will be prompted to pick a location and a name for the apk of the app. It is perfectly fine to just name it app and save it at the same destination that you start.
Before you start exporting your app, connect your device to the computer and if prompted by the device select "Move files". After that you just need to wait for Unity to finish exporting the app and you are done.